
Import and explore the samples
After adding Ultimate Water System 2D through Unity’s Package Manager, select the package, open its Samples list, and click Import. The sample scenes are the recommended starting point: they present complete configurations that you can run, inspect, and compare with the settings described throughout this guide.
Requirements
Ultimate Water System 2D 1.0 requires Unity 6.2 or newer and Universal Render Pipeline 17 or newer. The water uses the URP 2D Renderer, including its Camera Sorting Layer Texture for underwater scene rendering. Import the samples after installing the package so Unity can add the demo scenes and their supporting assets to the project.
Set up the demo rendering layers
When you open an imported demo scene, Unity displays the Ultimate 2D Water Demo Setup window. Choose Set Up Demo before evaluating the scene. The setup is required because the underwater rendering depends on a deliberate relationship between Sorting Layers and URP’s Camera Sorting Layer Texture.
The setup temporarily:
- Adds a block of DiffusionWorks demo Sorting Layers after the project’s existing layers.
- Assigns the demo scene’s renderers, Sorting Groups, masks, water renderers, modules, and prefabs to the intended demo layers.
- Enables and configures Camera Sorting Layer Texture and its boundary on the 2D Renderer Data used by the demo.
This makes the sample useful as a reference for your own project. Inspect the temporary layers from back to front, compare the water’s Surface Sorting Layer and Underwater Sorting Layer, and inspect the renderer’s Foremost Sorting Layer. The same principles apply to your scenes: the surface and underwater renderers use separate layers, underwater renders later, and the Camera Sorting Layer Texture boundary remains immediately before the underwater layer. The Reflections and scene captures chapter explains the ordering and feedback-loop constraint in detail.
If the underwater area still looks black or opaque after setup, enter Play mode so the demo rendering can initialize. Check the result with background sprites or props visible behind the water; without scene artwork to show through it, you cannot tell whether the underwater capture is rendering correctly.
The demo setup does not rename or delete your existing Sorting Layers. When you close or leave the last Ultimate Water demo scene, it restores the previous renderer settings and removes the temporary layers it created. If Unity closes unexpectedly, the package attempts recovery when the project next opens. If you cancel the popup, the demo may render incorrectly; reopen the setup from Tools → DiffusionWorks → Ultimate Water System 2D → Set Up Current Demo Scene when you are ready to apply it.
Sample scenes
| Scene | What it demonstrates |
|---|---|
| Main 2.5D | Perspective water depth, reflections, underwater composition, optional modules, and the nested-water exclusion-zone setup. |
| Main 2D | The core side-view workflow: waterline authoring, underwater rendering, interactions, buoyancy, wakes, currents, and character integration. |
| Main 2.5D Rain | A high-density atmospheric showcase focused on rain-driven Random Ripples, runtime water-value transitions, advanced water authoring, and the performance tradeoffs of many simultaneous analytical ripples. |
Main 2.5D
The Main 2.5D demo uses a perspective camera to showcase a real surface with depth, reflections, underwater composition, optional modules, and the nested-water exclusion-zone setup.
Main 2D
The Main 2D demo scene compares the major 2D presentation workflows in one place. Use it to see how the same system can move from a conventional side-view waterline to increasingly dimensional-looking surfaces while keeping a 2D authoring workflow.
- 2D Water shows the standard side-view water body with its waterline, underwater region, interactions, and effects.
- 2D Water with Fake Surface adds a projected top strip that suggests surface depth while the gameplay water remains 2D.
- 2D Water with Fake Surface and offset waves offsets the visible wave motion across the projected surface. The separation between the front and rear motion sells the illusion of a real 3D surface more convincingly.
- Simple Water demonstrates the lightweight custom-shape workflow for decorative water with editable geometry and appearance.
Main 2.5D Rain
Main 2.5D Rain is a separate showcase scene built to demonstrate the versatility of the water system and the degree of authoring control available for a dense atmospheric result. It combines the 2.5D presentation with rain-driven surface activity, a deliberately large number of Random Ripples, and an interactive example of changing water values during Play mode.
Runtime water values transition
Enter the dotted zone in the Main 2.5D Rain sample to preview a transition between runtime water colors and ambient-wave settings. The scene uses the included WaterBodyRuntimeControl script to make the change easy to inspect and trigger.
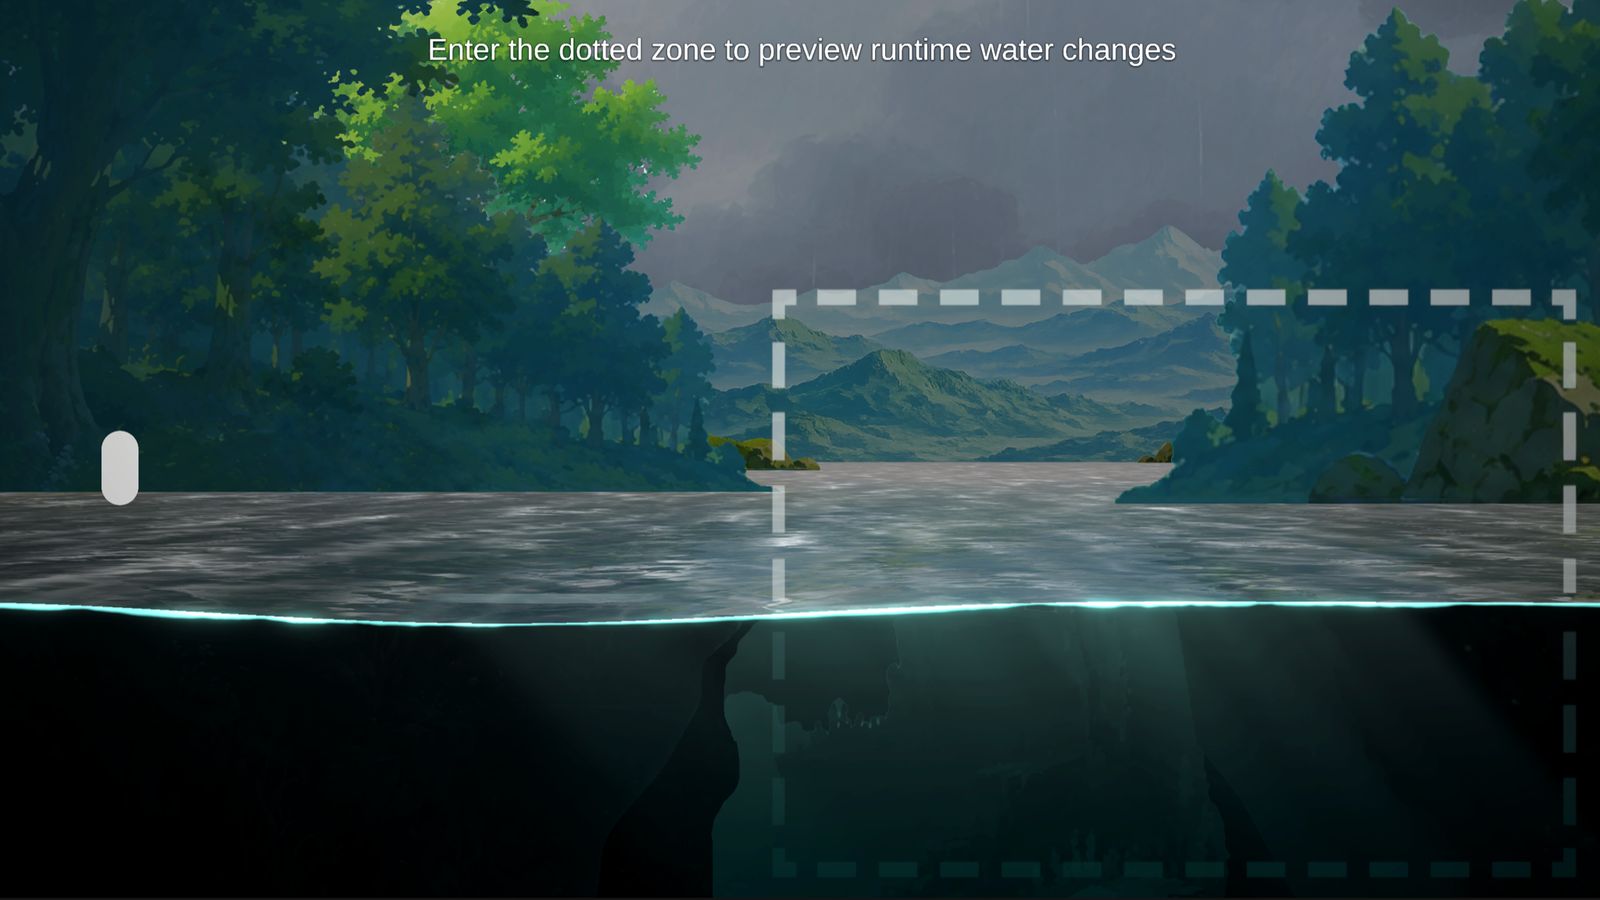
Sample code only:
WaterBodyRuntimeControlis an intentionally broad learning and prototyping example. Do not use it unchanged in production. Build a focused controller that changes only the values owned by your weather, area, timeline, or gameplay system. See Runtime controls and scripting recipes for the demonstrated values and safer integration guidance.
Performance note — Random Ripples: Random Ripples currently use analytical ripple evaluation, so dense rain and high spawn rates can have a noticeable performance cost and still have room for optimization. Even with that cost, a 2D game can readily run at 120 FPS with sensible ripple budgets. Profile on target hardware, reduce Ripples Per Second when needed, and cap the active visual and physics ripple budgets to balance the effect with the rest of your game.
Planned improvement: Random Ripples are planned to move from analytical evaluation to a RenderTexture-based heightfield simulation. The goal is to support substantially more simultaneous ripples at a lower runtime cost. Until that work ships, projects should budget and profile against the current analytical implementation.
Controller samples
The imported samples include three controller examples. Two delegate complete water locomotion to WaterCharacter2D; the third reads WaterSensor2D directly for a smaller, deliberately simpler movement model. Use the example closest to the controller you are integrating:
| Sample | What to learn from it |
|---|---|
SampleDynamicMovement2D |
A force-driven platform controller. Land movement accelerates a dynamic Rigidbody2D toward a target horizontal speed; water movement applies the complete velocity returned by WaterCharacter2D. Follow its input buffering, water-jump reset, gravity ownership, and entry-effect subscription. |
SampleKinematicMovement2D |
A cast-based controller that owns an explicit velocity, converts CurrentRaw through its own push/resistance response, resolves collision and sliding, moves with Rigidbody2D.MovePosition(...), then reports the collision-limited result to MotionTracker2D. |
SampleDirectWaterSensorMovement2D |
A compact sensor-only controller with selectable Dynamic and Kinematic body modes. It demonstrates straightforward swimming, shallow buoyancy, water jumping, and direct current integration without the surface-follow, dive-start, or water-entry locomotion state machine in WaterCharacter2D. |
These scripts are readable integration examples, not drop-in rules for every game. Your production controller should continue to own input, collision, animation, and final movement. Use WaterSensor2D to report water state, use WaterCharacter2D when its complete locomotion state machine fits the game, or integrate only the sensor readings your custom controller needs.
Shared timing and ownership rules
All three samples cache one-frame button edges in Update and consume them in FixedUpdate, preventing a jump or dive press from being missed when rendering and physics run at different rates. Their physics-step order is:
- Consume buffered input and inspect the current grounded/velocity state.
- Refresh water state before reading submersion, current, or locomotion state.
- Calculate exactly one water response path for the step.
- Apply the resulting velocity through the controller’s normal dynamic or collision-aware movement path.
- For custom or kinematic motion, report the velocity actually achieved after collision clipping to
MotionTracker2D.
CurrentRaw is the current direction multiplied by the configured strength and zone falloff. WaterCharacter2D forwards it unchanged and never applies it to locomotion. The sample controllers treat it as a target velocity offset and expose their own push, resistance, and multiplier settings; your controller may use a different interpretation.
Avoid applying currents twice:
SampleDirectWaterSensorMovement2Dapplies the sampled current itself. If the Water Current module also targets every Rigidbody automatically, exclude the player by tag or change the module’s target mode. The same ownership rule applies to any custom controller that consumesWaterSensor2D.CurrentRaworTryGetCurrent(...)itself.
Sample controls
The imported Player Input Actions asset provides these keyboard bindings:
| Action | Default key | Used for |
|---|---|---|
| Move | W A S D | Walking, surface movement, and directional swimming. |
| Jump | J | Ground jumps and valid water-surface jumps. |
| Dive | I | Diving in the dynamic and kinematic WaterCharacter2D samples. The direct-sensor sample uses vertical Move input for free swimming and has no separate Dive action. |
These bindings belong to the samples. Inspect or remap the imported Input Actions asset when evaluating another keyboard layout or gamepad, and connect the same gameplay actions to your own input layer when adapting the examples.
Inspect live sensor values in a sample
Add this temporary component to any sample player to see the most useful WaterSensor2D readings while the scene runs. The sample sensor can keep its existing automatic update setting because this script only reads the latest values.
using DW_UWS2D;
using UnityEngine;

[RequireComponent(typeof(WaterSensor2D))]
public sealed class WaterSensorDebugHud : MonoBehaviour
{
    private WaterSensor2D sensor;

    private void Awake() => sensor = GetComponent<WaterSensor2D>();

    private void OnGUI()
    {
        GUILayout.BeginArea(new Rect(16f, 16f, 340f, 150f), GUI.skin.box);
        GUILayout.Label($"State: {sensor.State}");
        GUILayout.Label($"Submersion: {sensor.Submersion01:P0}");
        GUILayout.Label($"Depth: {sensor.Depth:F2}");
        GUILayout.Label($"Surface Y: {sensor.SurfaceY:F2}");
        GUILayout.Label($"Water force: {sensor.WaterForce}");
        GUILayout.EndArea();
    }
}
Remove the component after testing, or replace OnGUI with your own debug UI. Watching these values while crossing the waterline is a quick way to decide which state or reading your production controller actually needs.
Other useful sample references
- All three controller samples use
SampleWaterEntrySplash, an internal sample helper, to scale and spawn an optional splash whenWaterSensor2Dreports entry through the surface. - The sample scenes include configured water bodies and modules that can be inspected beside the relevant chapters in this guide.
- Camera, color, lighting, and scene helpers support the demonstrations. They are not required by the water system.